- HubPages»
- Technology»
- Computers & Software»
- Computer Software»
- Office Software Suites»
- Microsoft Office
How To Remove A Page Number In Microsoft Word

Page Numbering in Microsoft Word
Whether you are creating a 10 page report or a 50 page thesis, page numbering is critical when formatting lengthy documents, and knowing how to add or remove a page number from specific pages is even more important, especially for title pages, footer pages or back cover pages.
In this article, you will learn how to remove a page number from a specific page in Microsoft Word. Also provided here are general steps to follow when adding and customizing page numbers.
Before we begin, let’s review how to add page numbers. If you want to add page numbers to all pages of your document, with the cursor positioned on any page in your document, click Insert, Page Number:

Next, select the location of your page numbers. By gliding your mouse over the different location, additional options for positioning your page number appear on the right. In this example, let’s say you want your page number positioned on the bottom right of all pages, and you just want to include the page number. In this case, select the following:


Page Numbering Format Options
There are various formatting options when page numbering. This is helpful if you need the number to be in a different format. To view formatting options for page numbering, select Page Number, then select Format Page Numbers, as shown on the right.
On the Page Number Format dialog box, you can change the Number Format, which includes standard numeric format, numbers with dashes, alphabetic options, or roman numeral style numbering. Under the Page Numbering section, you can also click the Start at radio button to specify a different number to start numbering with. This is handy if you are starting your page numbering on page 2 or later.
At this point, let’s say you have a three page document, with numbering on the bottom right as follows:

You decide that the last page of your document won’t need a page number because it will be a back cover. To remove the page number from the last page, you will need to add a section break so that you create an independent footer area on the last page to customize it with no page number.
How to Insert a Section Break
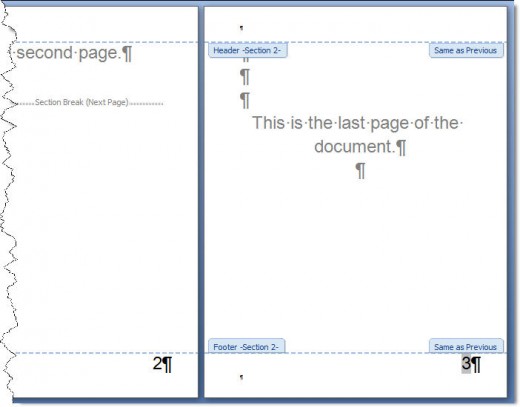
To insert a section break, first, go to the bottom of the next to the last page of the document (this is page 2 in our example document below).
It might be helpful to turn on Show/Hide so you can see where the bottom of your page is. To toggle on Show/Hide, click on this icon on your Home ribbon bar:

With Show/Hide turned on, in this example, you can quickly locate the end of page 2 (next to the last page):

With the cursor positioned at the end of the next to the last page, click on the Page Layout tab at the top of the screen, and then click on the Breaks drop-down arrow, and under Section Breaks, click Next Page:

Notice that a Section Break has now been added as follows:

Next, on the last page, double click in the footer area (double-click while pointing to the page number). The last page should now display the Footer area, along with Same as Previous indicators on the top right and bottom right. These indicators are normally set to Same as Previous to carry over Header and Footer information on subsequent pages.
The Design tab should now be displayed at the top of the screen with the Link to Previous option selected by default:

Click Link to Previous (which deselects this option) to “unlink” the footer on the last page (it will then have an independent footer). Notice the Same as Previous indicator no longer displays on the bottom right of the last page:

Now, on the last page, delete the page number in the footer (highlight the page number field and click Delete). Once the page number is deleted as shown below, click Close Header and Footer icon at the top toolbar.

Turn off Show/Hide if needed to view your document in Normal view.

End Result - Deleted Page Number on Last Page Only
The page number will then be removed from the last page, but it will be preserved on previous pages.
Here is the end result with the page number only deleted from the last page:

You can use these same steps to create custom page numbers in different sections of a large document.
If you need to suppress the page number from the first page, which is common for title or cover pages, there is an easy option for that. Just double click on the page number, on page 1 to open the Header and Footer area; in the Design ribbon bar, click the box for “Different First Page”. This automatically creates a unique header for page 1, and removes the page number just on page 1.

More Information on Page Numbering
For more information on page numbering and headers/footers, click the Help button in Word and search for “page numbering”.


